

こんにちは、CMB室の藤田です。
iPhone や iPad で人物に対して写真を撮るとき、カメラ画面には顔に対する境界枠があらわれます。
この仕組みは iOS の API である Core Image を使用したものです。
この Core Image は Apple の OS に使われるフレームワークなので macOS でも使用することが可能です。この仕組みを AppleScript で活用する方法をいろいろ検証してみました。
● 画像から顔を検出する
Core Image は画像内の顔を見つけますが、顔の認識ではありません。Apple Developer の Document/Detecting Faces in an Image の序文には以下のように記載されています。
Core Image can analyze and find human faces in an image. It performs face detection, not recognition. Face detection is the identification of rectangles that contain human face features, whereas face recognition is the identification of specific human faces (John, Mary, and so on). After Core Image detects a face, it can provide information about face features, such as eye and mouth positions. It can also track the position an identified face in a video.
(Google の自動翻訳)
「Core Imageは、画像内の人間の顔を分析して見つけることができます。認識ではなく顔検出を実行します。顔検出は人間の顔の特徴を含む長方形の識別であり、顔認識は特定の人間の顔(ジョン、メアリーなど)の識別です。Core Image が顔を検出すると、目や口の位置など、顔の特徴に関する情報を提供できます。また、ビデオ内の識別された顔の位置を追跡することもできます。」
Face detection(顔検出)は顔認識や顔認証とは違って、画像から人物の顔および目や口の位置などの情報を得る技術ということです。
● 顔や目・口の位置を取得する
では、さっそくやってみます。サンプル画像はこちら。
弊社フリーペーパー TACT Cafe vol.30 に私のインタビューが掲載された時に用意した写真です。

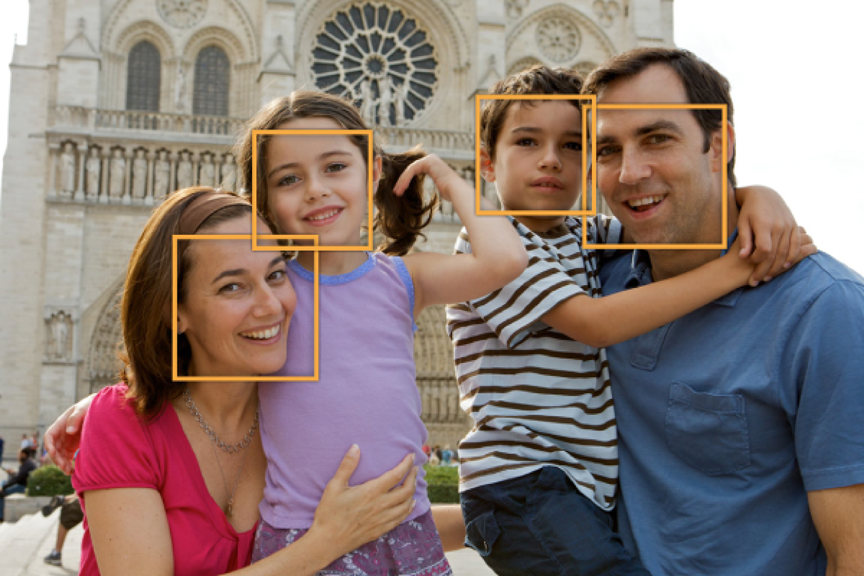
画像に写っている人間の顔に枠をつけるスクリプトを書いてみました。スクリプトエディタでごにょごにょと。スクリプトを実行して人物の画像ファイルを選択します。
書き出された画像がこちらです。
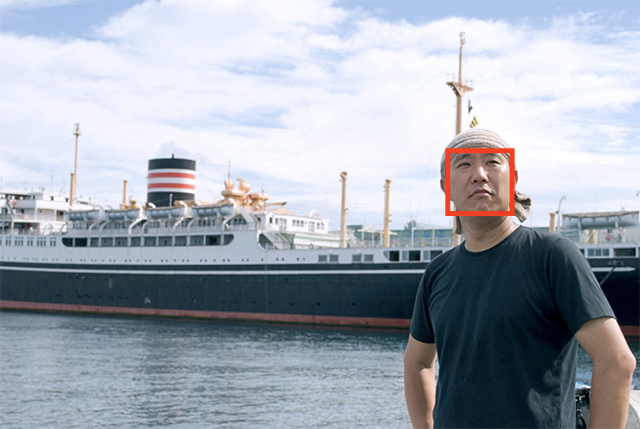
せっかくなので枠を角丸にしてみます。
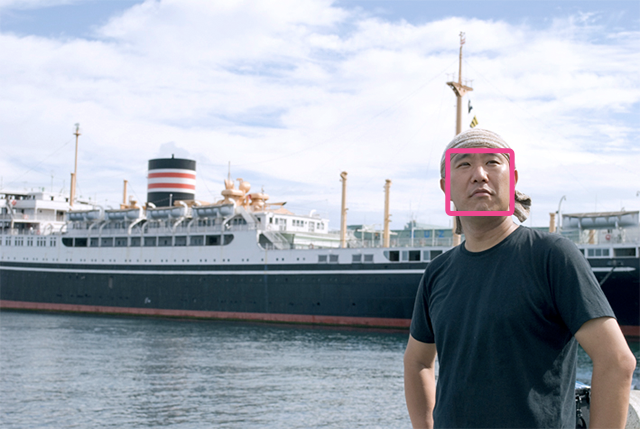
目と口も座標をもとに枠がつけられます。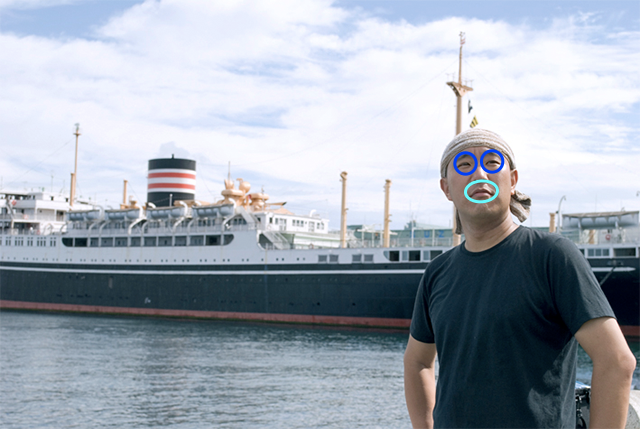
目の座標は瞳の真ん中を検出するようです。
● 顔写真に目線をいれる
目の位置(座標)がわかるのであれば黒く塗りつぶして目線をいれてみようではないですか。スクリプトエディタでごにょごにょと。スクリプトを実行して人物が映った画像ファイルを選択します。

書き出された画像がこちらです。
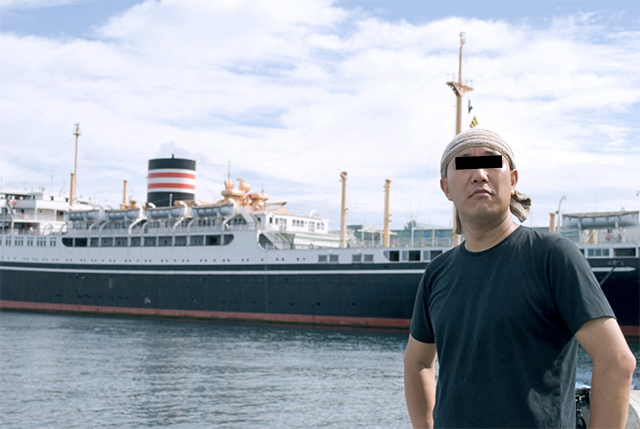
目線が入るといかがわしいですね…
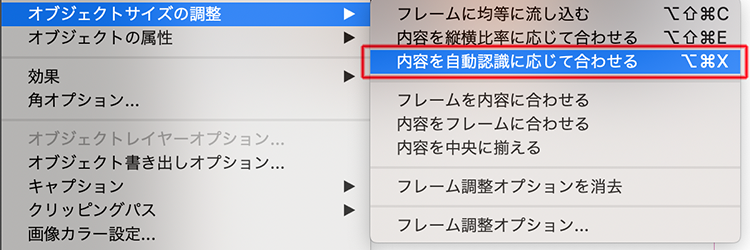
● InDesign の「内容を自動認識に応じて合わせる」機能
InDesign 2019 から「内容を自動認識に応じて合わせる」という機能が追加されました。AI を活用して画像を認識しているそうです。
画像コンテンツとフレームサイズに基づいて、画像をフレーム内に自動的に収めます。フレームのサイズは変更されません。
(InDesign でのフレームとオブジェクトの操作)
Adobe Sensei を使用して、画像の最適な部分が表示されるように自動的に拡大縮小して再配置する素晴らしい機能…なのですが、ユーザーが意図しない認識をしてしまう場合もあったり GPU を使わないと InDesign がクラッシュしてしまったりすることがあるようです。現時点ではあくまで補助的な機能でしょうか。
● InDesign で Core Image を活用してみる
今回検証した Core Image による顔検出を活用した AppleScript をつくってみました。InDesign に配置した画像の顔認識をおこない、画像フレームのセンターに調整します。
今回は InDesign で活用しましたが、顔検出の技術自体は Core Image の応用なので他のアプリケーションともさまざまな連携ができそうです。また、たくさんの顔写真を配置しなくてはいけない場合の自動組版にも活用できそうです。そういった顔検出などの API とアプリケーションが連携できるソリューションつくりは AppleScript ならではです。
● 技術的な話
画像に写っている人間の顔に枠をつける AppleScriptObjC のコードはこちらです。
-- -- 顔を検出して枠を表示
-- 人物の写っている画像から顔を検出して枠をいれます
-- 2020年5月 タクトシステム株式会社
-- Copyright © 2020 TACT SYSTEM Co. Ltd. All Rights Reserved.
-- https://www.tactsystem.co.jp/blog/post-806/

use AppleScript version "2.4"
use scripting additions
use framework "Foundation"
use framework "QuartzCore"
use framework "AppKit"

property NSString : a reference to current application's NSString
property NSImage : a reference to current application's NSImage
property NSGraphicsContext : a reference to current application's NSGraphicsContext
property NSBitmapImageRep : a reference to current application's NSBitmapImageRep

property roundedRect : true -- 角丸長方形にするなら true、長方形なら false

on run
  set imgPath to POSIX path of (choose file of type {"public.image"} with prompt "人物が映っている画像を選んでください。")
  my main(imgPath)
  return result
end run

to main(imgPath)
  -- NSImage をファイルから生成
  set aImage to NSImage's alloc()'s initWithContentsOfFile:imgPath

  set imageRep to aImage's TIFFRepresentation()
  set imgObj to NSBitmapImageRep's imageRepWithData:imageRep

  -- Retina ディスプレイで表示していれば2.0
  set retinaF to current application's NSScreen's mainScreen()'s backingScaleFactor()

  -- 幅と高さをピクセルで取得
  set pixelWidth to (imgObj's pixelsWide())
  set pixelHeight to (imgObj's pixelsHigh())

  -- 空白 RGB のビットマップをイニシャライズする
  set aRep to NSBitmapImageRep's alloc()'s initWithBitmapDataPlanes:(missing value) pixelsWide:pixelWidth pixelsHigh:pixelHeight bitsPerSample:8 samplesPerPixel:4 hasAlpha:true isPlanar:false colorSpaceName:(current application's NSDeviceRGBColorSpace) bytesPerRow:0 bitsPerPixel:0

  -- 画像サイズは Retina で表示しているかどうかで変わる
  set newSize to {width:pixelWidth / retinaF, height:pixelHeight / retinaF}
  -- ポイントでのサイズ指定(ピクセルは変わらない)
  aRep's setSize:newSize

  -- グラフィックスコンテキスト
  NSGraphicsContext's saveGraphicsState() -- 現在のグラフィックスコンテキストのグラフィックス状態を保存
  -- 指定されたオブジェクトをコンテキストデスティネーションとして使用して、新しいグラフィックスコンテキストをインスタンス化して返す
  set theContext to NSGraphicsContext's graphicsContextWithBitmapImageRep:aRep
  -- 現在のスレッドの現在のグラフィックスコンテキストを返す
  NSGraphicsContext's setCurrentContext:theContext
  -- アンチエイリアスの使用
  theContext's setShouldAntialias:true
  -- 画像の補間:最高の品質
  theContext's setImageInterpolation:(current application's NSImageInterpolationHigh)
  -- 指定された矩形内にイメージを描画
  aImage's drawInRect:(current application's NSMakeRect(0, 0, pixelWidth / retinaF, pixelHeight / retinaF)) fromRect:(current application's NSZeroRect) operation:(current application's NSCompositeCopy) fraction:(1.0)
  -- 現在のグラフィックスコンテキストのグラフィックス状態をリストア
  NSGraphicsContext's restoreGraphicsState()

  -- 新しい画像インスタンス
  set newImage to NSImage's alloc()'s initWithSize:newSize

  newImage's addRepresentation:aRep

  -- CIImage を生成
  set cImage to current application's CIImage's alloc()'s initWithBitmapImageRep:aRep

  -- 顔を検出
  set faceArray to my faceDetect(cImage)

  -- 顔が検出されないときは終了
  if (count faceArray) is 0 then
    return false
  end if

  -- 描画開始
  newImage's lockFocus()

  -- 枠カラー
  if roundedRect then
    set {r, g, b} to {1.0, 0.0, 0.5} -- 角丸のときはピンク
  else
    set {r, g, b} to {1.0, 0.0, 0.0} -- 長方形のときは赤
  end if
  set strokeColor to (current application's NSColor's colorWithCalibratedRed:r green:g blue:b alpha:1.0) -- alphaを1以下の数字にすると線が透ける

  -- 検出された顔ごとにループ
  repeat with face in faceArray
    -- 顔の位置とサイズ
    set faceBounds to face's |bounds|()

    -- 顔の位置とサイズを取得
    set {originX, originY, sizeWidth, sizeHeight} to my getFaceBoundsByScaleFactor(faceBounds, retinaF)

    -- ベジエパス(枠)を作成
    set theRect to {{x:originX, y:originY}, {width:sizeWidth, height:sizeHeight}} -- 枠
    set theNSBezierPath to current application's NSBezierPath's bezierPath
    (theNSBezierPath's setLineWidth:((5 / retinaF) as real)) -- 枠の線幅

    if roundedRect then
      -- 角丸
      set rad to ((my max(sizeWidth, sizeHeight)) / 10 / retinaF) as real
      (theNSBezierPath's appendBezierPathWithRoundedRect:theRect xRadius:rad yRadius:rad)
    else
      -- 長方形
      (theNSBezierPath's appendBezierPathWithRect:theRect)
    end if

    strokeColor's |set|() -- 色設定
    theNSBezierPath's stroke() -- 枠線を作成
  end repeat

  -- 描画ここまで
  newImage's unlockFocus()

  if roundedRect then
    set appendStr to "_roundedrect"
  else
    set appendStr to "_rect"
  end if

  set oldName to (NSString's stringWithString:imgPath)'s lastPathComponent()'s stringByDeletingPathExtension()
  set aPath to (((NSString's stringWithString:imgPath)'s stringByDeletingLastPathComponent()'s stringByAppendingPathComponent:(oldName's stringByAppendingString:appendStr))'s stringByAppendingPathExtension:"png")

  set newRep to NSBitmapImageRep's imageRepWithData:(newImage's TIFFRepresentation())

  --書き出しファイルパス情報を作成
  set pathString to NSString's stringWithString:aPath
  set newPath to pathString's stringByExpandingTildeInPath()

  --書き出し
  set myNewImageData to (newRep's representationUsingType:(current application's NSPNGFileType) |properties|:(missing value))
  return (myNewImageData's writeToFile:newPath atomically:true) as boolean
end main

-- 顔検出
on faceDetect(cImage)
  -- -- 検出器のオプションを NSDictonary で作成
  set opts to current application's NSDictionary's dictionaryWithObject:(current application's CIDetectorAccuracyHigh) forKey:(current application's CIDetectorAccuracy)

  -- 検出器をオプションとタイプを指定して作成
  set detector to current application's CIDetector's detectorOfType:(current application's CIDetectorTypeFace) context:(missing value) options:opts

  -- 顔の検出を行う際のオプションを NSDictonary で作成
  set opts2 to {CIDetectorImageOrientation:1} -- 向き:"UIImageOrientationUp"

  -- 顔検出を実行
  set faceArray to detector's featuresInImage:cImage options:opts2

  return faceArray
end faceDetect

-- 大小の比較
on max(a, b)
  if a is greater than b then return a
  return b
end max

-- 顔の位置とサイズを取得
on getFaceBoundsByScaleFactor(faceBounds, retinaF)
  -- 顔検出のプロパティは OS のバージョンによって戻り値が変わる
  if class of faceBounds is list then
    -- High Sierra 以降
    set faceX to faceBounds's first item's first item
    set faceY to faceBounds's first item's second item
    set faceWidth to faceBounds's second item's first item
    set faceHeigh to faceBounds's second item's second item
  else
    -- Yosemite から Sierra
    set faceX to faceBounds's origin's x
    set faceY to faceBounds's origin's y
    set faceWidth to faceBounds's |size|'s width
    set faceHeigh to faceBounds's |size|'s height
  end if
  return {(faceX / retinaF) as real, (faceY / retinaF) as real, (faceWidth / retinaF) as real, (faceHeigh / retinaF) as real}
end getFaceBoundsByScaleFactor
※Cocoa の機能を使用しているため OS X Yosemite 以降で使用可能となっています。
● 謝辞
今回の記事作成にあたり、以下の Web サイトを参考にさせていただきました。ありがとうございます。
ASH Planning: AppleScript + 顔認識
画像の指定エリアを塗りつぶし – AppleScriptの穴